Showing posts with label Spellbinders Nestabilities. Show all posts

Saturday, April 7, 2012

For My Sweet Daughter...

My amazing step daughter is inspiring to me. She works crazy hours, she's also in university, and just moved out on her own with roommates. I'm SO proud of her. She's also suffered some loss in her life and just keeps her chin up...always positive, and always thinking of others. (To her detriment.)

Another reason she inspires me is how much she loves my children...her little sister and brother. She was 16 when my daughter was born, and 18 when her little brother came around. She has loved them unconditionally even though she didn't ask for them (or me!) to be in her life! They ADORE her!

She's been a bit blue lately, Gee, really?? Stress from university, working, and just being a gorgeous 22 year old will do that to you. 

I love you so much, sweetheart. This one is for you. I cried when I read the sentiment. 


Now for the details...

Sadly, I KILLED MY CUTTLEBUG today while trying to make the doily! Yes, it's a sad day. But my DH took me to the local scrapbooking store and bought me the new Spellbinders GRAND CALIBUR!!! What an upgrade! WAHOOO!!!!

Apparently it won't work with Sizzix dies - they're too fat. But I only use Spellbinders dies and Cuttlebug folders for embossing. Easy peasy. 

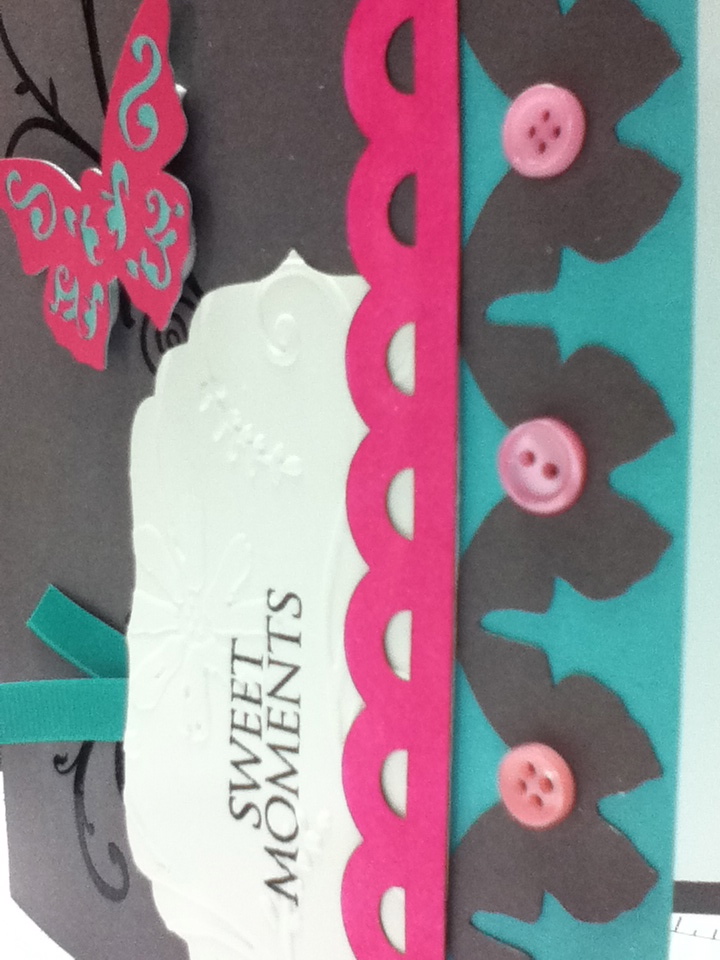
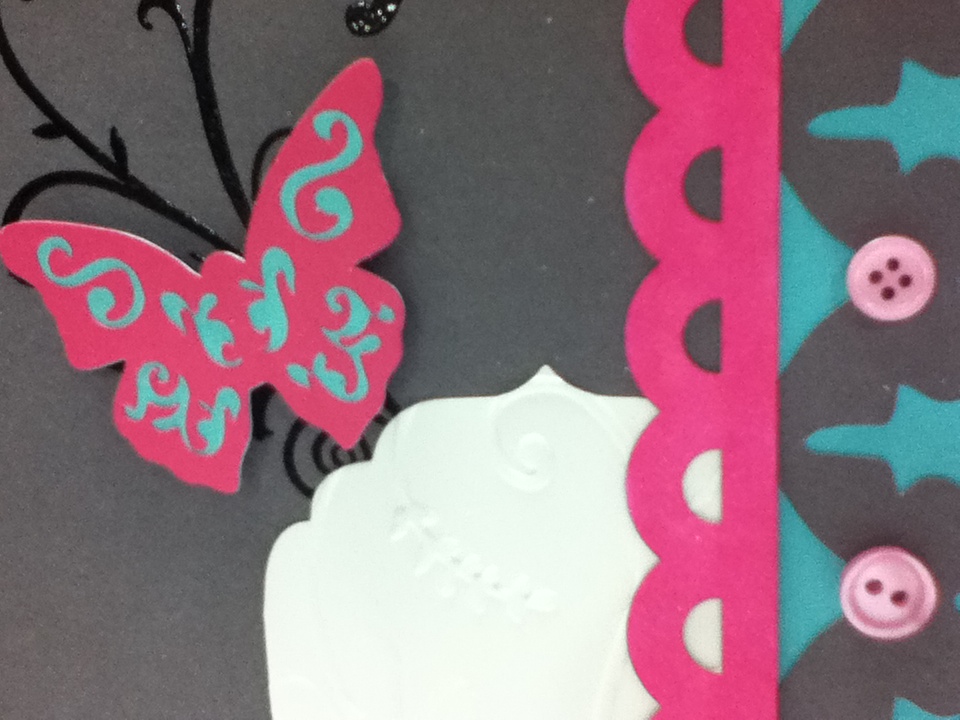
SO......the doily is from Cheery Lynn, the labels are from Spellbinders, as is the flower. Darnit - I'm going to have to REALLY work hard to remember to put the dies in edge UP - not edge DOWN like my Cuttlebug...

The papers (except the kraft) are from Stella CTMH. I LOVE, LOVE, LOVE this medley. Stunning. The beautiful striped ribbon is also a CTMH gem! I sewed on a Gina K button with some twin, and DONE!! Of course I inked the edges. 

ENJOY. 

NOW YOU DO IT!!

Tuesday, October 25, 2011

Ballerina Card

My daughter is done her dance class tomorrow so I decided to make her dance instructor a card! I used my Fleur-de-Lis Rectangle Spellbinder, a gorgeous Magnolia stamp, and of course, COPICS!!! Sometimes I just have to colour...you know the feeling. I highlighted the tiara and the swirlies around Tilda with my Versamark pen and added CTMH Glitter. And to finish it off, of course, My Pink Stamper stamps.


NOW YOU DO IT!

Monday, October 10, 2011

Cricut Circle Blogiversary Recipe

The challenge for this contribution was to make a card with the following criteria:

1. Title
2. At Least Two Cricut Cuts
3. At Least Three Buttons

Since I've cleaned up and organized my scraps I was thrilled to have a new project to use them on! I am always drawn to this colour of green. CTMH has one called Juniper...I don't know what else to call it. I LOVE it. I decided to pair it with a really bright fuschia, and the background paper is kind of a greyish brown. I also used my Copics to colour the CTMH border to match the fuchsia colour. I also used Spellbinders Labels 4 and ran it through the Cuttlebug. 

I then stamped the flourishes on the background and heat embossed them. 

The card and butterfly are both from the 'Sophia' Cartridge. 


NOW YOU DO IT!

Saturday, August 27, 2011

Flower Doily Card

To make this card I used the Cheery Lynn Designs Doily DL 102, French Pastry, and CTMH Emporium. I LOVE this paper packet. It is a classic. I then cut out the scalloped circle from Cricut Essentials at 2 inches and 2.4 inches. I stamped the little basket from the new stamp set from CTMH (It's a DUO!!! Gift with qualifying purchase for August and September!)

I used my blending pen to pick out the inks of Twilight, Vineyard Berry, Sweet Leaf and Cocoa. I liked the look of these versus my Copics - and I love my Copics - but wanted a rougher look, not as smoothly shaded. 

Sentiment is from ... you guessed it! My Pink Stamper Stamps! Cut using Nestabilities. 

NOW YOU DO IT!

Tuesday, August 23, 2011

Butterfly Card

This is by no means an original idea. I used the butterflies from Elegant Edges after trying a few others that tore. I love the black and white background and then the pretty pink butterfly! I embellished with CTMH Sparkles. The sentiment is from My Pink Stamper. I used Spellbinders to cut it out! 


NOW YOU DO IT!


Thursday, August 4, 2011

Family Frame


I have really wanted to 'branch out' into Home Decor - not my strong suit, and nothing I am too familiar with. But I am so inspired by fellow crafter's blogs and posts that I thought I would try something! I used the following:

8 x 10 picture frame, glass removed
Cardstock from stash
Sweet Leaf (CTMH) Carstock
CTMH Topiary Ink
CTMH Sweet Leaf Ink
CTMH Wings paper
CTMH Opaques
Cricut Art Nouveau Cartridge
Cricut Art Philosophy Cartridge (CTMH)
Cricut Damask Decor
Cricut Storybook
Cricut Gypsy Font
CTMH Dimensionals
CTMH Flax - Sorbet
Spellbinders
Martha Stewart punch
My Pink Stamper Stamps


I began with the flower vine from Art Nouveau and built from there, layering like crazy and using pop dots. I still wasn't quite satisfied so I added some cut and embossed Spellbinders flowers and punched the side base paper with a Martha Stewart punch. I used various My Pink Stamper stamps to stamp "Treasure", "Scripture Power" and "Heart & Soul".


NOW YOU DO IT!

Manly Pedestal Card

 I had some leftover paper and even some coloured images from my last project. I thought it would be fun to make a pedestal card for my dad, using this picture of him from last summer. He was doing chores and pushing my little guy and my nephew in the wheelbarrow. My dad is also Mr. Camping-Extraordinaire, and although this isn't 'camping', his acreage often has a campfire going and it's all about FAMILY.

 I used the piece of 'Outdoor Denim' cardstock, cut at 4.25" by 12" and scored at 6" and 8.5". I'm not sure I like such a shallow fold...we'll see how to change it in the next pedestal card.


I cut these layers to fit perfectly the first layer - 4.25" by 6", and then the inner layer 4" by 5.75". The lower panel is similar - 3.5" by 4.25" then the layer is 3.25" by 4". 

I cut the bear image out and layerd it with my Nestabilities; the tree and fire I cut out using my Honeybee scissors. As much of a Cricut girl that I am, there is something so nice about cutting with scissors!


I used a LOT of pop dots, some grommets and hemp to finish this fun card!

NOW YOU DO IT!

Friday, July 22, 2011

Fun Fishing Layout

I've really been in the mood to colour with my Copics lately...and I chose inspiration for this layout from the "Beary Best" stamp set (C1363) from CTMH. I rifled through my paper packs - which are numerous (shhhhh!) and picked the "Back Country" pack. I then used my Copics and coloured the bears to match up with the paper. That's what I love about Copics - they can match and blend to any colour - complete perfection!


I set the bears on the background paper while colouring to ensure I blended properly and got the desired colour. These bears are SO cute and I decided to give them little pink tummies. I cut them out using circles from Spellbinders Nestabilities and embossed them as well.

I used CTMH's "Cherish" to decide on a layout. I don't always use the books for ideas, but sometimes when I have been so busy making cards (oops!) I need some help getting back in scrapbooking mode. That is when I grab a paper pack, grab a book for layouts, and go to work. 

I distressed and inked the edges of the background paper. As a result of how good it looked, I decided to put the papers a little further in the border - to show off the distressed edges. I also found some unmarked ribbon in my stash that matched PERFECTLY!

I used my Scrap'N Easel to place things how I liked....
I was somewhat concerned about the black and white picture of my little fella - that it was a little too 'cool' for such a 'warm' layout. I pulled out my Tim Holz distressing inks and made it a little warmer, a little more sepia. 
I used two more fantastic stamp sets to add embellishments - D1468 - "On This Day" and W329 "Dream Big"...really cute little sets. I embedded them in the layout like tickets. FUN!


I added the bears, some more ribbon and we are done!

NOW YOU DO IT!


  © Blog Design by Simply Fabulous Blogger Templates

Back to TOP